Wednesday, September 30, 2009

TECH TIP

TOPIC: Using Save As with References

If a drawing or an assembly is needed which is similar to another but uses a few different components; using the save as command and changing the references, the components that need to be renamed can be before any changes are made.

Procedure
:
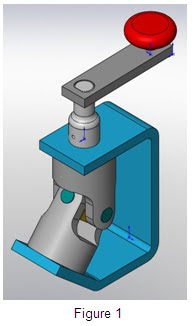
A small assembly is shown to the right in Figure 1. The bracket needs to be different. Rather than recreating the entire assembly from scratch, the Save As command will be used to change the assembly name as well as the bracket name.

1. Open the assembly that is similar to the desired result.

2. Go to File, Save As and select the References icon under the Cancel icon. See Figure 2.

3. Double click the names of the files that need to be different. In this case the assembly and bracket will receive new names. New files are shown in green. See Figure 3.

4. Select Save All.


Notes:
The More Options icon in Figure 3 enables adding a prefix or suffix to multiple files when selected.
The Name or Folder column can be selected to change all file names or location.
A different drawing can be saved using the same procedure.


TECH TIP

TOPIC: Text Borders

Borders can be placed around text in a drawing to manually create items
such as revision symbols or balloons.


Procedure: Use the note command.
Select the border box in the property manager.

Select the type of border Select the spacing around the text


Examples:


TECH TIP

TOPIC: Numbered or bulleted text

How is the spacing controlled between the numbers or bullets and text on a drawing?


Procedure: When editing the text, RMB and select “Bullets and Numbering . . .”


“First Line Indent” sets the space between the number or bullet and the text.


Notes: Lines can be controlled separately if so desired.
TECH TIP

TOPIC: Inspection Documents using eDrawings

SolidWorks enables the user to mark specific dimensions on drawings as inspection dimensions by placing an oval around the specific dimension value. eDrawings Professional offers a means to create an electronic version of this document for inspection purposes. This provides a means to document the measured values of these critical dimensions, maintain any notes related to the measurement method and securely store this information in an electronic format separate from the original SolidWorks source drawing.

Procedure:
From within eDrawings the native SolidWorks drawing file is opened and saved as an eDrawing document. Using the mark up functionality and associated comments the inspection document can be created, edited, and reviewed by others who can also reply to existing comments or add their own.

1. In eDrawings open the native SolidWorks drawing, detached drawings are supported as well, and save the file as an eDrawing file type. (.edrw)

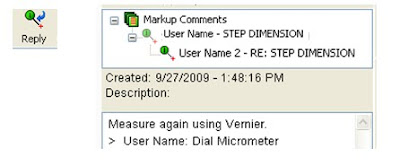
2. Select the mark up icon from the left side of the screen to open the markup dialog panel. Each inspection can be listed here with comments that will appear in the bottom half of the panel. Also the various shapes for the inspection data can be selected from this panel as well a general notes.


3. Placing a rectangle in the graphics area and using text to record the measured value will generate a comment in the Markup Panel. A descriptive name can be applied and any text such as the measuring device used for this inspection can be added. The current “User Name” is applied automatically.


4. Selecting the comment will enable the Reply function. The current user can respond to individual inspection comments.


Notes:

1. The filename of the inspection document can be identical to the original native SolidWorks document.
2. PDM Enterprise can automate this creation process and also allow a specific workflow for the inspection document.
3. eDrawings also has “stamps” such as APPROVED which can be permanently applied to the file.
4. Markups can also be saved in external files separate from the .edrw file, where they can be imported at any time.

Tuesday, September 15, 2009

TECH TIP

TOPIC: Schedule a Defrag on multiple drives

One of the most over looked and easiest things to fix for system performance is defragmenting your disks. The problem is making the time to run it and if you have several disks then you have to wait for one to finish before starting the next. There are fee based software’s out there that can do this, but why spend the money. I found this tip on the Microsoft website and it works great.

Procedure:
Use the Window’s task scheduler with some minor task editing to add a drive letter. Not as obvious as you might think…


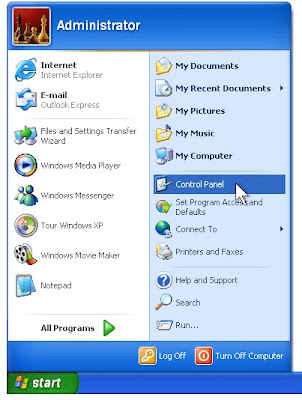
1. Click Start, and then click Control Panel


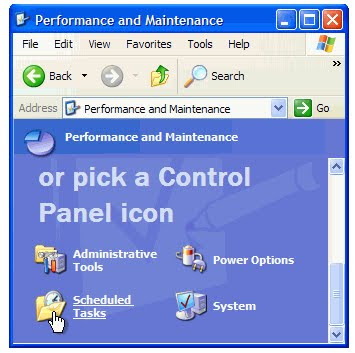
2. Click Performance and Maintenance

3. Under or pick a Control Panel icon, click Sheduled Tasks.


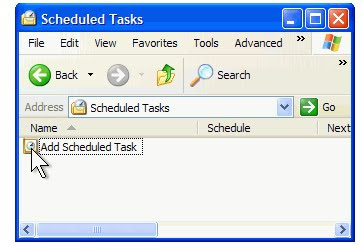
4. In the Scheduled Tasks window, double-click Add Scheduled Task.

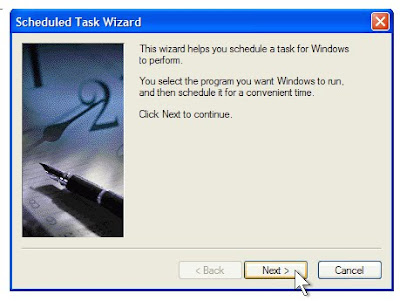
5. In the Scheduled Task Wizard, click Next.

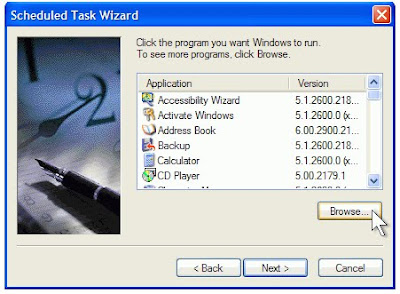
6. Click Browse

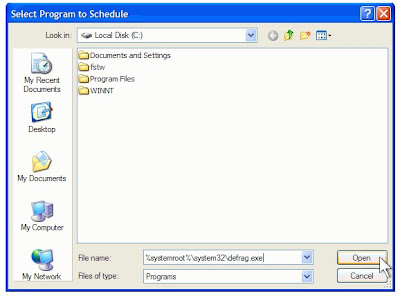
7. In the File name box, type %systemroot%\system32\defrag.exe and then click Open.

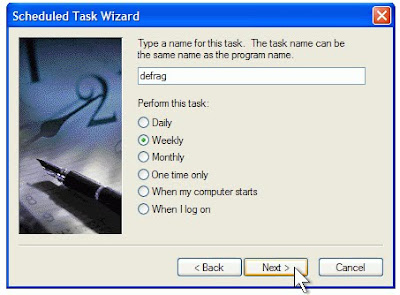
8. Under Perform this task, click Weekly. Then, click Next.

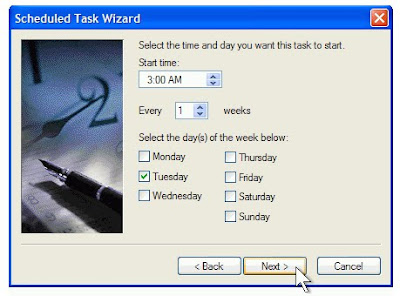
9. Set the time and day of the week you would like to defragment your hard drive. For best results, choose a time when your computer will be on but you will be away from it. Click Next.
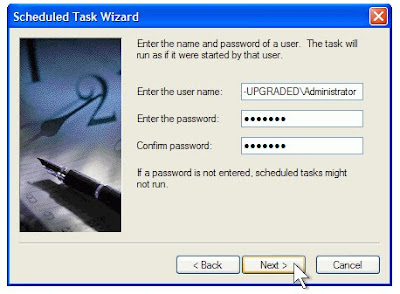
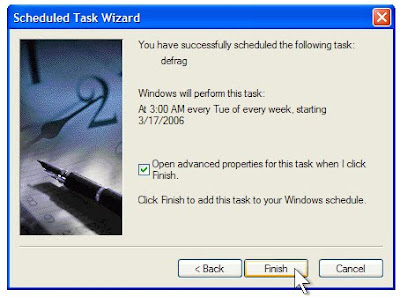
10. Type your password in both the Enter the password and Confirm password boxes. Then, click Next.

11. Select the Open advanced properties for this task when I click Finish check box, and then click Finish.

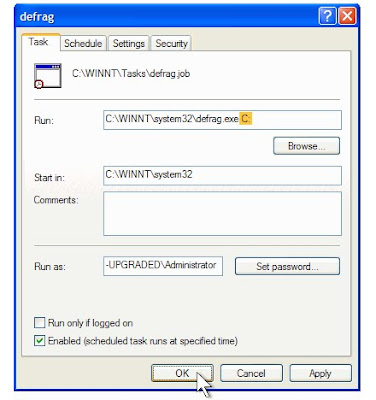
12. In the Run box, add C: to the existing command. Make sure you include a space before the “C:”. Then, click OK.


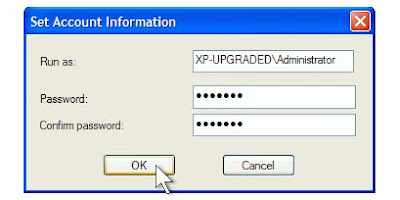
13. In the Set Account Information dialog box, type your password in both the Password and Confirm password boxes. Then, click OK.

Windows XP will defragment your hard drive at the time you have scheduled. During defragmentation, a black window will open. If you happen to be working at your computer when the window opens, you can ignore it. The window will automatically disappear when defragmentation is complete. You can use other programs during defragmentation, but you may prefer to schedule defragmentation at a time when you won’t be using your computer.
Defragmentation works best when you have plenty of free space on your hard drive.

Notes:

Link to procedure from Microsoft (http://www.microsoft.com/windowsxp/using/setup/tips/defrag.mspx)


TECH TIP

TOPIC:
3D Drawing View Mode


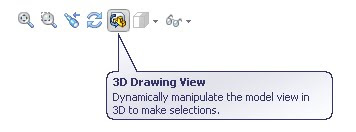
3D drawing view mode will dynamically manipulate the model in a drawing view. It’s typically used to select items that are behind other entities.

Procedure: The command can be accessed from the heads-up view toolbar.


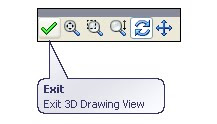
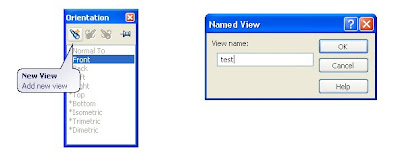
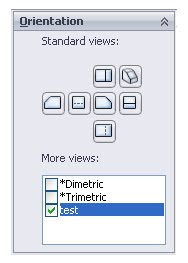
After selecting a view you can pan, zoom, or rotate. When you Exit, the view returns to its original orientation.Notes: It’s possible to save the orientation to be used in this or another view. The prerequisite for this functionality is that the view must be a named view.

To save the orientation press Spacebar before exiting the command and create a new view.

The new view will then be available to use in this or any other named view.


TECH TIP

TOPIC: Locking your dimension style with the right mouse button.

Sometimes one may want a dimension placed in an odd position other than horizontal or vertical, but maintain either the horizontal or vertical dimension orientation. This can be achieved easily if you watch your mouse feedback when placing the dimension.

Procedure:

During Sketching, the user can lock a dimension orientation when needed. This can be achieved by looking for the right click option symbol when placing a dimension.

1.Select the Smart Dimension Icon, and then select the items to be dimensioned then move to the desired location.

2. Look for the right click option symbol (shown below). When the dimension is in the desired orientation, hit the Right mouse button and lock this orientation.

a. Linear Dimensions:
b. Angular Dimensions:


3. The dimension can now be moved to any location, but will maintain the current orientation.

Notes: With many commands the user should watch the feedback options available.

1. When extruding a feature look for the green check mark option with the right mouse click. It’s faster than hitting the return key or selecting it from the confirmation corner.
2. If you go to tool, Sketch Tools, Modify
TECH TIP

TOPIC: Indent as In Context cut

Using in-context cuts to provide clearance for interfering parts in an assembly is a useful technique. However there are times when finding a sketch plane and creating the sketch can be problematic. In these cases consider using the Indent command with its “cut” option enabled.

Procedure:
Open an assembly that has parts interfering. In this case we have a square structural member protruding through a sheet metal safety guard.

1. Edit the part that will be modified with the cut. In this case the Sheet Metal Guard.


2. Select the Indent command and select the Target Body (sheet metal guard) and the tool body (square tube). Optionally a clearance or “gap” can be specified. In this case a .125 inch space is created around the square tube.


3. Because the tool body was a tube this command produced a left over remnant in the guard. Using delete body removes this unwanted material. If the tool body (square tube) had been solid this would not have happened.


Thursday, August 27, 2009


Join ModernTech Mechanical for a no-cost "What's New in SolidWorks 2010" event in your area! Enjoy a complimentary breakfast while we cover topics including an overview of SolidWorks 2010 updates and capability enhancements for the following software solutions:
  • SolidWorks Design
  • SolidWorks Simulation
  • Enterprise PDM
  • 3DVIA Composer
  • SolidWorks Sustainability

To register, click HERE. Once you register, you will receive further details on event location, including directions!

All events run from 8a.m. - 12:15p.m.

Oct. 5
Nashville, TN
Birmingham, AL

Oct. 6
Tampa, FL
Montgomery, AL

Oct. 7
Orlando, FL- Featuring Rick Chin of SolidWorks
Memphis, TN
Mobile, AL -
Z Corp 3D Printing/Scanning Showcase 1:30pm - 4:30pm

Oct. 8
Jacksonville, FL- Featuring Rick Chin of SolidWorks
Fort Walton, FL -
Z Corp 3D Printing/Scanning Showcase 1:30pm - 4:30pm

Oct. 13
Fort Lauderdale, FL
Charlotte, NC
Knoxville, TN

Oct. 14
Atlanta, GA
Greenville, SC
Miami, FL

Oct. 15
Lawerenceville, GA
Chattanooga, TN
Raleigh/Cary, NC

Oct. 16
Columbia, SC

Oct. 20
Peachtree City, GA
Huntsville, AL

Oct. 21

Ashville, NC

Oct. 22
Charleston, SC

Oct. 27
Winston-Salem, NC

Oct 28
Panama City, FL

Wednesday, August 12, 2009


SolidCAM 2009 Boot Camp Seminar

ModernTech Mechanical invites you to attend SolidCAMP 2009, a FREE seminar on the release of the Newest and Best Version EVER - SolidCAM 2009!

Learn survival techniques with SolidCAM Professor Sidney Eisner while enjoying the world's largest private collection of vintage and modern motorcycles and Lotus racecars - the Barber Vintage Motorsports Museum
  • SolidCAM - a SolidWorks-certified Gold Product with seamless, single-window integration and full associativity to SolidWorks parts, assemblies and configuration manager. \
  • A complete range of major manufacturing applications ranging from 2.5D Milling to simultaneous 5-axis Milling, Turning, MillTurn and WireEDM.
  • Over 25 years of development. Simply the best, easiest to use and easiest to learn CAM Software for SolidWorks users.
    Seminar Agenda

Seminar Agenda

  • Find out what’s new in SolidCAM 2009, the most powerful version ever – with over 100 improvements!
  • Get through the obstacle course with Tips and Tricks from SolidCAM Professor Sidney Eisner.
  • Sneak preview on the upcoming version SolidCAM 2010.
  • \Crack the code of SolidCAM’s I-Machining, HSM and HSS Modules.

Join us for this free seminar to get the jump on your competitors and be eligible to win free SolidCAM 2.5D Mill Professional with 3 years Maintenance and unlimited SolidCAM Professor access, $7100 value


WIN Door Prizes such as High-Performance Cutting Tools from GW Schultz and Gift Certificates from the Bass Pro Shop next door to the museum.


MEET personally with local SolidCAM reseller CAMcad Technologies personnel and learn what they offer in terms of support, training, and consulting services.

Thursday, July 30, 2009

TECH TIP

TOPIC: Applying legacy textures in SolidWorks 2009

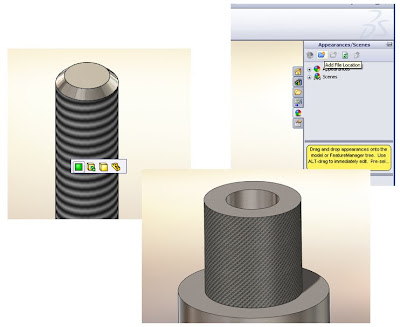
In SolidWorks 2008, there were textures like knurl and crust, as well as threads that could be applied to faces. In SolidWorks 2009, textures have been replaced with appearances for editing. However, what if you still want the legacy textures? They are still available for use with a couple of extra steps!

Procedure:

  1. With SolidWorks open > expand the task pane > pick the appearance tab icon (looks like a beach ball)
  2. Pick the 'Appearances' icon at the top of the list and then the 'Add File Location' above it on the title menu
  3. Browse to data\images\textures
  4. A list of all the SolidWorks textures should be in the tree view on the right. To apply them to a model drag and drop them in the graphics area and pick one of the references from the popup menu (part, feature, etc.) to apply.

Thursday, July 9, 2009

Beta Testing Tips

So, you have signed-up to be a SolidWorks 2010 Beta Tester. Here are some tips to get you off to a great start!
There are some considerations/best practices to keep in mind when testing for a beta release. First, do not run a beta release synchronous to a production release on a computer. Once files are converted to the newer version they cannot be taken backwards to the production version. Work only on copied files in directories created specifically for beta testing, and be sure to backup all toolbox and data locations before beginning. While testing the interface and the ‘new functionality’ is important, first focus on the areas that are important to your business and everyday usage of the application. These are the areas that bugs will affect your business the most and submitting these bugs early in a beta release will help insure that they are addressed in a timely manner and prevent down time or loss of functionality.

There's never been a better time to revitalize your business with SolidWorks!

Find out how easy it is to move to SolidWorks and become more efficient and competitive. And, for a limited time you can qualify for significant savings on SolidWorks CAD software.*

Take the next step
Register by July 31st, 2009 to take advantage of a complimentary personalized design productivity assessment. We’ll analyze your business and discuss the return on investment thousands of companies like yours have achieved by moving to SolidWorks.

Successful companies use SolidWorks
More than 60% of the Fortune 500 Most-Profitable Companies use SolidWorks' proven technology to be more productive.** Learn how we can do the same for you.

Wednesday, July 8, 2009


SPECIAL SOLIDWORKS AND DELL PROMOTION

Save $500 on the purchase of any Dell Precision Workstation priced at $2000 or more when you buy SolidWorks software

Tuesday, June 30, 2009

Tech Tip

Topic: Tongue and Groove

The lip/groove command can be used to generate a tongue and groove feature.

Procedure: Use the lip/groove command twice, once on each side.


Notes: The lip/groove command controls all of the dimensions including taper angles and gaps.


Thursday, June 4, 2009


Join us for this no-cost event to learn advanced techniques in
3D design, analysis, printing and scanning.

There are 4 educational sessions available to attend including:
  • Advanced SolidWorks functionality
  • Advanced SolidWorks Simulation techniques
  • Using Z Corporation 3D Printing for manufacturing real world parts
  • Turning Scan Data into a parametric model using Z Corporation RapidFormand Z Scanner

Attend 1 or all 4. It’s up to you!

Also joining us for a special Show ‘N Tell session, are local firms who design in 3D. These firms will share with you their favorite designs, some challenges they face, and most importantly why they love SolidWorks.

This is a no-cost event and includes food, fun and giveaways.This is not a sales event! No sales pitches will be heard- welcome to an anxiety-free educational event!

If you design in SolidWorks, perform analysis with SolidWorks Simulation, or outsource your prototypes - don’t miss this event! Don’t use SolidWorks or Z Corporation products but are considering a transition? This event is for you too!

Huntsville Museum of Art, Huntsville, AL

June 25, 2009 4pm - 8pm

REGISTER HERE

Thursday, May 28, 2009

TECH TIP

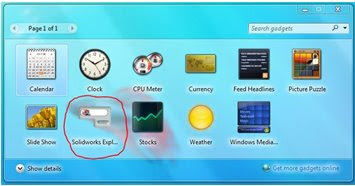
TOPIC: SolidWorks Explorer Windows Sidebar Gadget

With the introduction of the Windows Sidebar in Vista, SolidWorks wanted to get their piece of the action. They accomplished this in the form of the SolidWorks Explorer Gadget. This gadget installs just as quickly and easily as any other Windows Sidebar Gadget and allows the user to quickly search all SolidWorks files and display the results in SolidWorks Explorer.


Procedure:
In order to use the gadget, it must first be installed, but once installed is very easy to use.


1.)
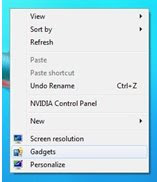
Installing the gadget is done using the Gadget interface, activated quickly by right clicking on the desktop and selecting “Gadgets”.


2.)
Once the gadgets screen is brought up, right click on the SolidWorks Explorer gadget and select “Add”.

3.)
After adding this gadget, it is ready to use by typing in a search name and pressing enter. The search results will come up in SolidWorks Explorer.

Notes:

  1. In order to limit the search range, SolidWorks Explorer only searches the items listed in the Search Folders option of SolidWorks Explorer. These folders are added automatically by adding items to the Windows Desktop Search in Vista and to the Library in Windows 7.
  2. This functionality will also search a Workgroup PDM vault, but requires login to the vault that is to be searched.

TECH TIP

TOPIC: Not sure how to design for manufacturing?

SolidWorks is amazing software, however it can still design parts that cannot be built or are very costly to build. Are you costing your company more money by designing expensive parts? Here is an example where the part contained sharp internal corners. This can be costly and unnecessary. Here is a tip to help you design better products for manufacturing. You already have it; it’s called DFM Xpress Analysis Wizard (DFM stands for Design for manufacturing).


Procedure:
Once you have modeled your part and would like to see if it can be improved follow these steps:


1.)
Just open a part file and go to: Tools/DFMXpress or select the Evaluate Tab in the Command Manager and select the DFMXpress Analysis Wizard Icon.


2.
SolidWorks does the validation, however the user must dictate some of the test criteria. “..Enter your test criteria, such as “minimum corner radius”. This tool also checks for other criteria as shown below:


3.
Just open a part file and go to: Tools/DFMXpress or select the Evaluate Tab in the Command Manager and select the DFMXpress Analysis Wizard Icon.


Notes:

  1. It is never a bad idea to run your designs by an experienced machinist for tips on dimension technique that will save him time and make his job easier.
  2. Try to design parts with standard holes and chamfers where possible.
  3. Avoid extra smooth surfaces if not necessary and tight tolerances. Use 2 place tolerances where applicable.
  4. Other features that can be verified are: minimum angular tolerance zone, linear tolerance zone, corner radius (turned part), and tool depth to diameter ratio etc.


Thursday, April 30, 2009

TECH TIP: Selecting edges for surface sweep path

Using model edges for the path on a surface sweep saves time by eliminating the need to create another sketch. However sometimes the entire edge is not desired, only a small portion is required for the sweep. In this situation using “Selection Manager” enables the ability to use only a portion of the edge.

Procedure:

These two images show the creation of a surface sweep along the edge of an existing surface. The standard selection of an edge as the path is shown on the left, and the Selection Manager method on the right.


  1. Start the surface sweep command and select the profile as usual.
  2. Right mouse click to invoke the Selection Manager option. Using the Select Group option, select the edge.
  3. Prior to acceptiong the Selection Manager, drag the end of the path along the edge.
  4. OK the Selection Manager and the Sweep command.


Notes:

  1. Only drags along the selected edge are supported in this technique
  2. The endpoint that is coincident with the profile must remain so.
  3. Object snaps can be used to specify the endpoint of the dragged profile.