Wednesday, September 30, 2009

TECH TIP

TOPIC: Using Save As with References

If a drawing or an assembly is needed which is similar to another but uses a few different components; using the save as command and changing the references, the components that need to be renamed can be before any changes are made.

Procedure
:
A small assembly is shown to the right in Figure 1. The bracket needs to be different. Rather than recreating the entire assembly from scratch, the Save As command will be used to change the assembly name as well as the bracket name.

1. Open the assembly that is similar to the desired result.

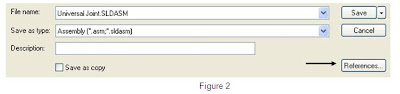
2. Go to File, Save As and select the References icon under the Cancel icon. See Figure 2.

3. Double click the names of the files that need to be different. In this case the assembly and bracket will receive new names. New files are shown in green. See Figure 3.

4. Select Save All.


Notes:
The More Options icon in Figure 3 enables adding a prefix or suffix to multiple files when selected.
The Name or Folder column can be selected to change all file names or location.
A different drawing can be saved using the same procedure.


TECH TIP

TOPIC: Text Borders

Borders can be placed around text in a drawing to manually create items
such as revision symbols or balloons.


Procedure: Use the note command.
Select the border box in the property manager.

Select the type of border Select the spacing around the text


Examples:


TECH TIP

TOPIC: Numbered or bulleted text

How is the spacing controlled between the numbers or bullets and text on a drawing?


Procedure: When editing the text, RMB and select “Bullets and Numbering . . .”


“First Line Indent” sets the space between the number or bullet and the text.


Notes: Lines can be controlled separately if so desired.
TECH TIP

TOPIC: Inspection Documents using eDrawings

SolidWorks enables the user to mark specific dimensions on drawings as inspection dimensions by placing an oval around the specific dimension value. eDrawings Professional offers a means to create an electronic version of this document for inspection purposes. This provides a means to document the measured values of these critical dimensions, maintain any notes related to the measurement method and securely store this information in an electronic format separate from the original SolidWorks source drawing.

Procedure:
From within eDrawings the native SolidWorks drawing file is opened and saved as an eDrawing document. Using the mark up functionality and associated comments the inspection document can be created, edited, and reviewed by others who can also reply to existing comments or add their own.

1. In eDrawings open the native SolidWorks drawing, detached drawings are supported as well, and save the file as an eDrawing file type. (.edrw)

2. Select the mark up icon from the left side of the screen to open the markup dialog panel. Each inspection can be listed here with comments that will appear in the bottom half of the panel. Also the various shapes for the inspection data can be selected from this panel as well a general notes.


3. Placing a rectangle in the graphics area and using text to record the measured value will generate a comment in the Markup Panel. A descriptive name can be applied and any text such as the measuring device used for this inspection can be added. The current “User Name” is applied automatically.


4. Selecting the comment will enable the Reply function. The current user can respond to individual inspection comments.


Notes:

1. The filename of the inspection document can be identical to the original native SolidWorks document.
2. PDM Enterprise can automate this creation process and also allow a specific workflow for the inspection document.
3. eDrawings also has “stamps” such as APPROVED which can be permanently applied to the file.
4. Markups can also be saved in external files separate from the .edrw file, where they can be imported at any time.