TOPIC: Schedule a Defrag on multiple drives
One of the most over looked and easiest things to fix for system performance is defragmenting your disks. The problem is making the time to run it and if you have several disks then you have to wait for one to finish before starting the next. There are fee based software’s out there that can do this, but why spend the money. I found this tip on the Microsoft website and it works great.
Procedure:
Use the Window’s task scheduler with some minor task editing to add a drive letter. Not as obvious as you might think…
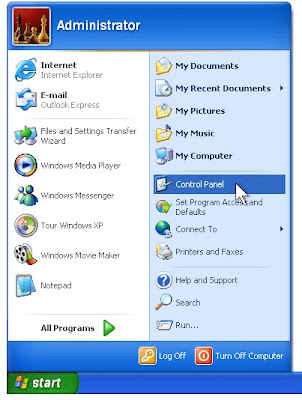
1. Click Start, and then click Control Panel
 2. Click Performance and Maintenance
 3. Under or pick a Control Panel icon, click Sheduled Tasks.
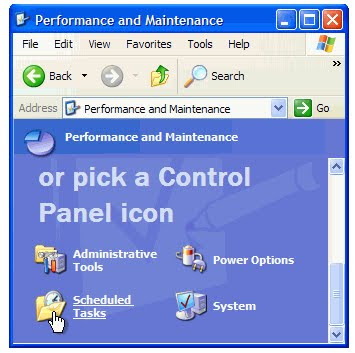
4. In the Scheduled Tasks window, double-click Add Scheduled Task.
 5. In the Scheduled Task Wizard, click Next.
 6. Click Browse
 7. In the File name box, type %systemroot%\system32\defrag.exe and then click Open.
 8. Under Perform this task, click Weekly. Then, click Next.
 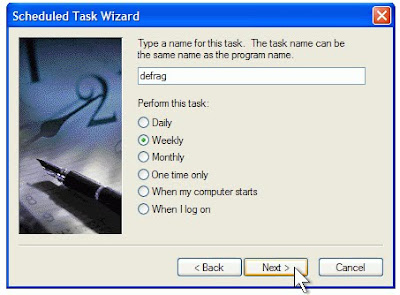 9. Set the time and day of the week you would like to defragment your hard drive. For best results, choose a time when your computer will be on but you will be away from it. Click Next.
 10. Type your password in both the Enter the password and Confirm password boxes. Then, click Next.
 11. Select the Open advanced properties for this task when I click Finish check box, and then click Finish.
 12. In the Run box, add C: to the existing command. Make sure you include a space before the “C:”. Then, click OK.
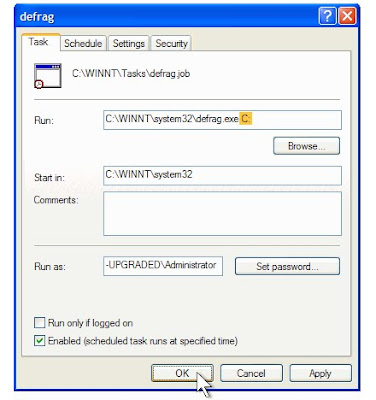
13. In the Set Account Information dialog box, type your password in both the Password and Confirm password boxes. Then, click OK.
 Windows XP will defragment your hard drive at the time you have scheduled. During defragmentation, a black window will open. If you happen to be working at your computer when the window opens, you can ignore it. The window will automatically disappear when defragmentation is complete. You can use other programs during defragmentation, but you may prefer to schedule defragmentation at a time when you won’t be using your computer.
Defragmentation works best when you have plenty of free space on your hard drive.
Notes:
Link to procedure from Microsoft (http://www.microsoft.com/windowsxp/using/setup/tips/defrag.mspx)